Spring Tissue Paper Wreath - Tutorial

Monday, February 27, 2012

SpringTissuePaperWreath1I've never been a fan of money. I like the things you can get with money, sure...like crafting supplies, an education, or a good read. And I don't really mind earning money, though I feel supremely lucky that I don't need to command an income presently. But the way that green stuff just twists you up inside with worry sometimes doesn't feel like very nice at all.

"I want this, but I shouldn't buy it. I would really like this, but I don't need it. Is this worth it? Is this being wasteful? BUT I JUST WANT IT! I deserve it." Then the credit card or the cash comes out and in a flash that light of instant gratification is turned on. A feeling of warm euphoria wraps its arms around me and pushes up my lips into a smile. It teases my brain saying, "you did good." And then the shopper's-high is gone. And so is the money.

So that I don't have buyers remorse, or spenders-withdraw, I like to change it up with a thrifty endeavor sometimes. This craft is pretty inexpensive while being relatively impressive. Tissue paper is pretty cheap, though I'd recommend quality stuff for this project. The really thin stuff just rips too easily. And with a wreath form, a dab of glue, and a bit of ribbon you can make a very pretty spring tissue paper wreath. (A side note, if your wreath form comes shrink wrapped in plastic, don't even take that off. Just glue the tissue paper right to the outside of the plastic. That way when you get tired of this decoration, you can just take off the plastic and start over designing another wreath!)

SpringTissuePaperWreath2 
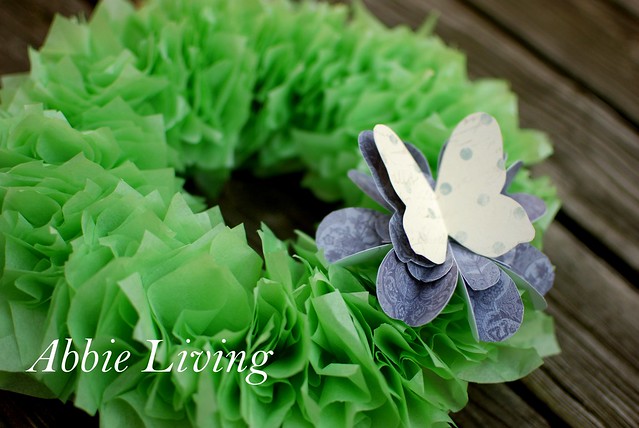
The butterfly and flower adornment are a recreation of my beloved blue hydrangea but you can use any accent you wish. Store bought or hand-made, either will work fine with this simple wreath. I attached a bit of wire to the back of the butterfly, threaded the flower through and then stuck the wire through the foam wreath form to keep it all in place. Like most of the projects I love, this job takes some patience and a little bit of time. But I believe time well spent, considering the nifty result.

Materials

SpringTissuePaperWreathA

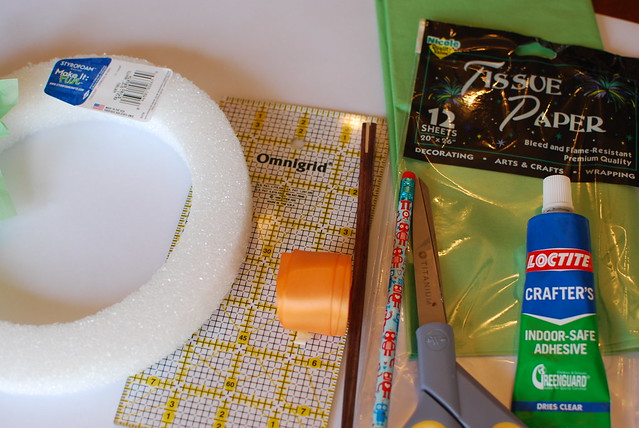
  • Green tissue paper (how much depends upon how big your wreath form is. Mine was 8" and I needed approximately 1/2 a package)
  • Scissors
  • Ruler
  • Pen
  • Wreath form (this one is 8" in diameter)
  • Craft glue
  • Orange ribbon (how long depends upon how long you'd like the loop to be. I used about 24".)
  • Chopstick (use one from the take-out bag! You are going to use the non-eating end.)


How To

SpringTissuePaperWreathG 
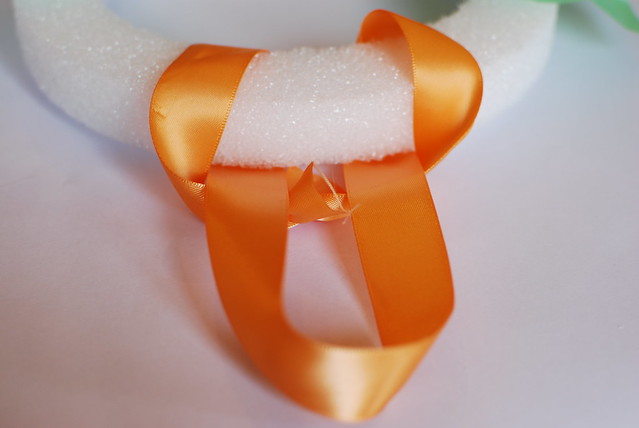
1. Knot the ends of the ribbon together. Make sure the ribbon isn't twisted. Fold the circle in half, (so you'd get two length of ribbon side-by-side) and loop it around the edge of the wreath form. Pass one loop end through the other loop end and affix it all with a dab of glue to the back of the wreath form.

SpringTissuePaperWreathB
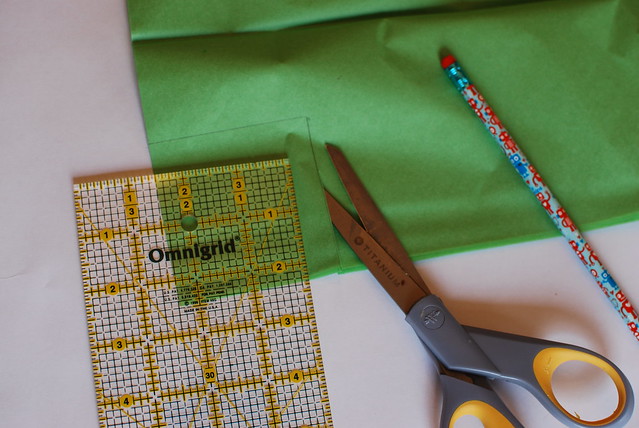
2. Measure with the ruler, and mark with the pen, 3"x3" squares of tissue paper. Cut them out with a scissors.

SpringTissuePaperWreathC3 
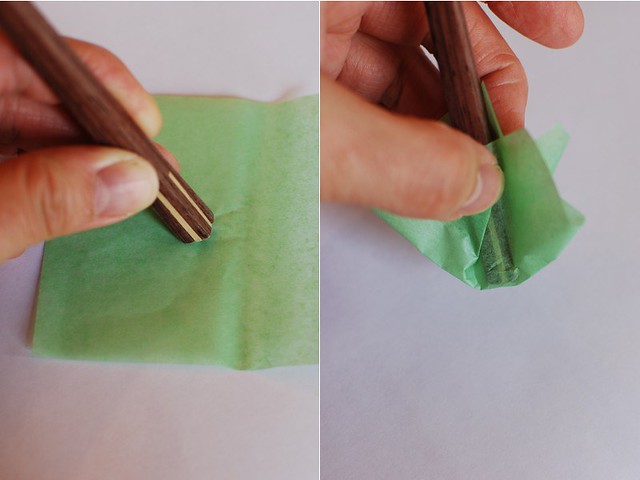
3. Take the chop stick and place the larger end at the center of the tissue paper square. Gather up the edges of the tissue paper around the chop stick, and set this aside, with the chop stick still inserted.

SpringTissuePaperWreathD1 
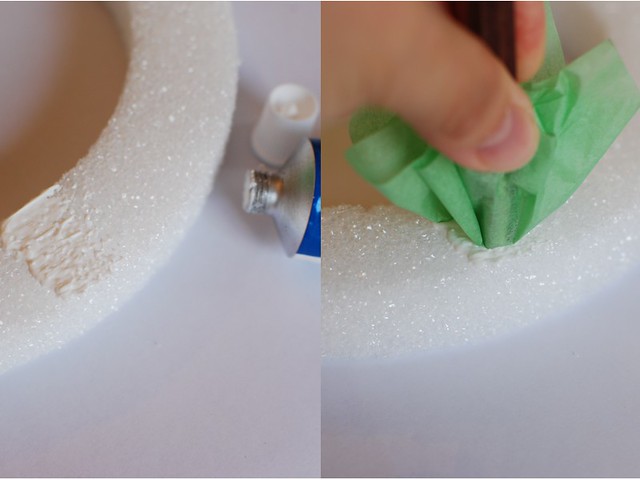
4. Spread a dab of craft glue onto the wreath form and use the flat end of the chopstick to press the tissue paper bunch onto the wreath form. Remove the chop stick and let the tissue paper stand up.

SpringTissuePaperWreathF 
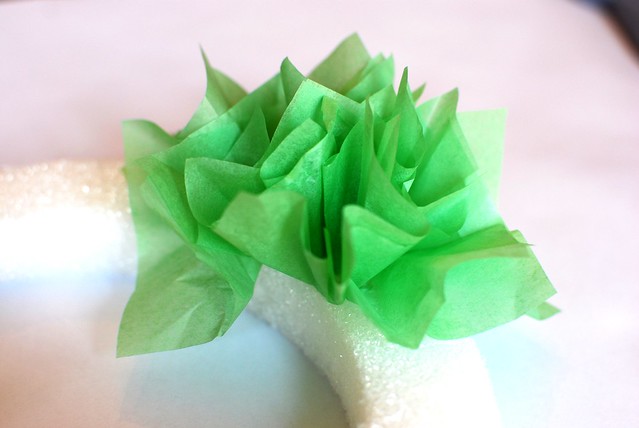
5. Continue folding tissue paper squares around the chopstick and then pressing them into the glue on the wreath form. Of course, spread more glue as necessary. Try not to glue a large area at one time, since the paper bunching takes time and you don't want the glue to dry too much. Bunch the paper together as little or as tightly as you'd like to get a less, or more dense effect.

SpringTissuePaperWreathH
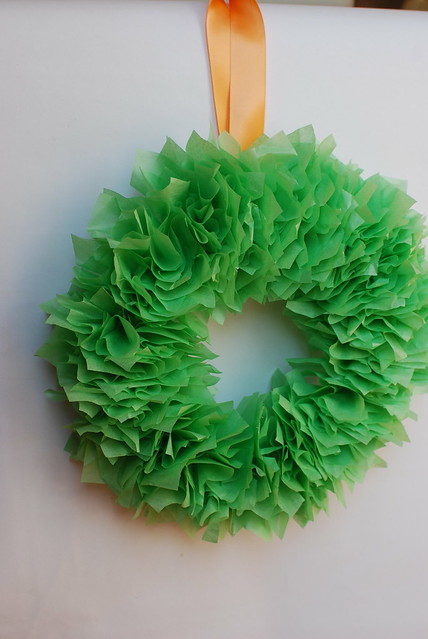
6. And then you get your basic tissue paper wreath. Adorn it with the accent of your choice and hang it up to admire your work.

*     *     *

Outtakes:

ButterflyTries 
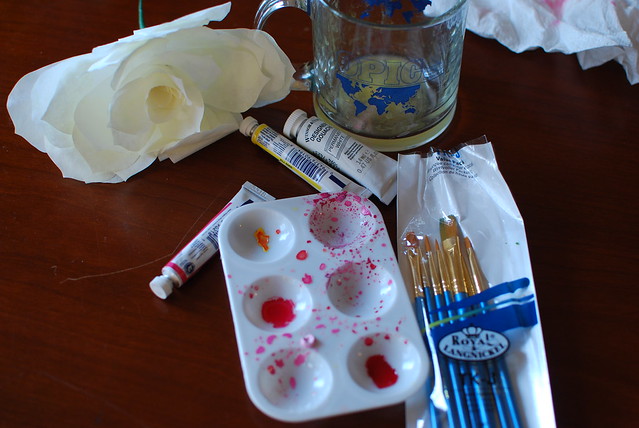
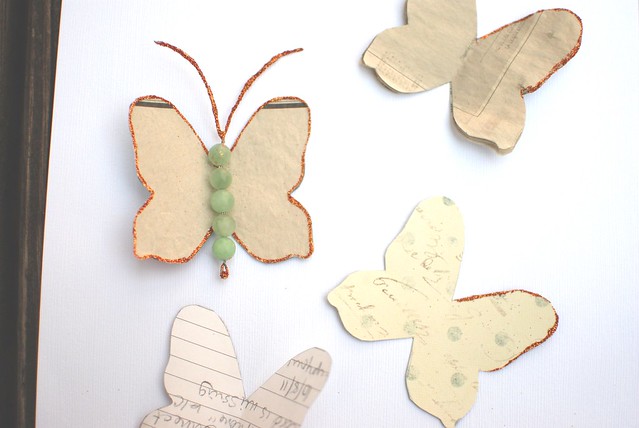
It took me longer to create the butterfly flower accent than it did for me to come up with and shoot the wreath tutorial idea. I dipped newspaper into old coffee to antique it. I did glitter tape and glue glitter. I did beads and wire...and I ended up doing a simple paper motif. Figures.

Inspiration:
Butterfly inspiration from Laeriss from the blog A Heart in Provence
And Sea Mat by Cornflower Blue Studio -- see, inspiration can transcend mediums!

Stenciled Tile Coasters for Lent - Tutorial

Thursday, February 23, 2012

JesusStencil8

Lent is here. I half dread this time of the year. The sacrifice, formal confession, and self examination to prepare seem daunting and overwhelming. I've only been Catholic for a little under seven years now. The confessional still gives me butterflies. I can't eat until afterward. Shaking hands with a priest is intimidating to me. And the new responses at Mass...well I am already feeling anxious typing these words.

I take Lent day by day. Baby steps is what it takes to keep that Lenten promise. Getting back on the horse when you fall off brings you closer to getting it right the next time. Courage and asking for help keeping my faith through the unknown gives me strength to get through to Easter. Practicing my faith in my own way is something I am learning every day.

Since I am a doer and I work with my hands, I decided to do just that this Lenten season. I will craft.

I've found so much Easter crafting inspiration on Pinterest. And I've found inspiration from God himself. No kidding, this craft came to me as I was praying. Just in a flash really. I think it was God mixing a bit of all my loves together. My love of color, love to try a new technique, and my new love for typography all flowed together to create these stenciled tile coasters for Lent.

Materials:

  • (4) 4"X4" white ceramic tiles (I got mine at Home Depot in the tile-flooring section for 16 cents each.)
  • enamel acrylic paints in different colors (or the same color) These paints are by Folk Art, and cost about $3 a bottle. The ones I used here are: 4028 Purple Lilac; 4003 Baby Pink; 4120 Soft Apple; 4017 Lemon Custard 
  • medium flat paint brush (the tip should be square, not pointy.)
  • (1) sheet adhesive mailing labels 2"X4" or larger (and maybe another for mess-ups and printer jams, I used Avery 18163)
  • A computer printer (and the computer to go with it...and a word processing program,) or you could hand draw your own letters
  • X-acto knife (with sharp extra blades)
  • masking tape
  • A thick magazine you don't want to read (or you could use a self-healing mat if you have one of these nifty things.)
  • An oven, like the big one in your kitchen
  • (16) adhesive felt circles 1/2" diameter or smaller (or alternatively you can use some Fabri-Tac glue and felt scraps and make your own.)


How To:

1. Wash tiles with soapy warm water and rinse. Wipe dry. 

Jesus Stencil1 2. Using a computer printer, print on the adhesive mailing labels the words "love," "hope," "faith," and "Jesus." (Do a couple test prints first and see how large your words come out, and where they lie on the page. I was able to get each word, except Jesus, to fit on it's own label. This makes it easier later. Using MS Word, and Garamond font in 100 pt. with 24 pt spaces between each letter, I got something that fit well on the 4" tile. My left page margin was .5" and I didn't use the label wizard.)

JesusStencil3 3. Place the labels sheet on the thick magazine and use an X-acto knife to cut out the black letters. (A patient hand makes the best round corners. This will be your stencil. For the letters with middle parts, like, "o," and "a," leave a small part to keep the middle piece from flying around. See my "e" above.)

JesusStencil9 4. Cut a masking tape piece to fit along the bottom side edge of the tile. Place it on the side edge as below. Make one edge flush with the face of the tile and fold the tape to the back of the tile. If the tape peels up a little, this is not a problem since the stencil label will fold over the top of the masking tape in the next step.

JesusStencil6 5. Carefully peel off the label backing, align the label-stencil along the masking-taped edge of the tile and press all edges of each letter so that they firmly adhere to the tile surface. (Press with the round back end of the X-acto knife and not with your fingers, to avoid getting oils onto the surface of the tiles. This will help prevent the enamel paint from streaking.) Fold the bottom edge of the label over the masking tape edge. I took a bit of artistic liberty here and made the letters drop off the edge of the tile to make them look like they were peeking up.

6. Gently paint over your stencil with the color of your choice. And let dry for about 30 seconds before removing the stencil and the masking tape. I had a terribly difficult time with this step. In lieu of pouncing, I decided I liked the brush stroke look. After tons of streaky finishes, I deduced that you should use the smallest amount of paint to get adequate coverage, wait until it barely dries, about 30 seconds, and then give it another very thin coat. Keep your brush strokes light and all in the same direction. Don't forget to brush out the paint that bunches up and collects in the corners because it will just makes lines and smears in the end. Remember to remove the stencil before the paint dries entirely, or else risk your hard work coming up like a bad sunburn-peel. AND, most importantly, don't let your four-year-old-crafter-in-training take over with her gloppy paint-ridden paintbrush!

JesusStencil4 7. Use the X-acto knife to gently scrape off those smears, smudges, and imperfect lines, like the one on the "o" you see above. This part was so very satisfying. It was like cleaning, perfecting, and polishing all in one. Don't brush the bits of paint off the project. It will make your perfect lines peel. Carefully use the knife blade and point to remove the excess paint you scrape off.

JesusStencil5 8. And presto, a clean stenciled tile.

9. To set the paint, the container says that you can let your work dry for 21 days or bake it for 30 minutes. If you are like me and you need blog pictures, let the tiles dry for 1 hour and then put them in a cold oven. Set the temp at 350 degrees F, and let the tiles and the oven warm up together. Set the timer for 30 minutes, after which turn off the oven and let the whole lot cool off. Remove your cool tiles from the oven and they are  now handwashing/top-dishwasher rack safe.

10. Glue four felt circles to the underside of the tiles; one at each corner.
JesusStencil7
*    *    *

I am not really a coaster kind of person. I was thinking of attaching ribbon to the backs and hanging them up on hooks too. In the end I decided this might be best as a gift. And I have just the person in mind!

Outtakes:
This was one of the first times I've stenciled anything. It felt like rouge low-tack paint tape on dirty walls with all the seepage of paint under the stencil.

This paint stuff comes off the tile with some hot soapy water and a scrubbie. Near-perfection, was achieved after many, many re-do's.

My daughter decided to help mid-project. Not good. Too much paint. Everywhere!

I tried to re-use the stencil she used so I didn't have to X-acto knife the entire thing again. Word to the wise: don't do it. Do not reuse the stencils. Its messy, smudgy, and yucky.

I am not sold on the yellow in this color combo. Maybe its too spring-chick-like for me. And the green came out really, really light. I like the hue, but not the intensity. So if you are considering "green-apple" or "lemon custard" you might want to think again.

Inspiration:
If you've read this far...that's great! I thought I'd add in a couple of links to show my appreciation for some of the other artists out there who created the wonderful work that inspired this craft. Thank you!
Hand Painted Tile Coasters by Marangelie Caballero
Scrabble Tile Coasters LOVE by Terrills Tiles


When you are third...

Monday, February 20, 2012

DSC_0557 *sigh* When you are third...and it's cool outside...and you are only wearing a diaper...but you want to go outside...
  DSC_0541

Making Gifts for Him

Friday, February 17, 2012

35 gifts for 35 years. 24 ended up getting made, collected, and given forth to that special birthday husband. A couple of shots, of a couple of the gifts I made for my guy...

DSC_0342 DSC_0341
Sundae Toppings with handmade labels! (I added rainbow sprinkles to the sampler at the last moment.)

DSC_0337
Homemade hot chocolate mix. From this recipe.

watercolor carrots
Watercolor drawing. Summer carrots anyone?

marble magnets
Marble magnets with more guy-prints. Super-duper easy to make. Tutorial here!

So, how did I give the gift of 24?

He took the day off from work. We were going to be running around quite a bit that day, dropping off to school, picking up from school, and making sewn swans at the other school before heading home to beat rush-hour traffic. I decided to space out the gifts and give them every 30 minutes or so. I organized the gifts in a chronological order that made sense. Giving him a pocket knife at school while sewing felt swans isn't practical. And then I hid them all in locations where I could pull them out and give them at the appropriate time. And then...I programmed them all into my smart phone. When, where, what, and who. (Well, the who was all the same person really.)

It was about 11:30 AM and we were on gift number 10 before he figured out what that "alarm" was all about.

He was surprised. Delighted. And so, it was a success.

More birthdays!

Wednesday, February 15, 2012

gluten free chocolate cake
My wonderful husband's birthday was last week. He has now dipped into that mid-thirties phase of life. He is dipping gracefully I'd say. (I don't think he'd mind my mentioning that here.) In between Little Miss' birthday, Mini Mister's half birthday, picking up the pieces of the holiday season, and getting the new year going, I put together a birthday celebration plan!

It is difficult enough to buy presents for men. My guy doesn't really need anything. Nor does he really have any specific obsessive hobbies to speak of. So what is a wife to do?

Lately I've been doing a lot of nothing for those special celebratory occasions. I've heard from countless, empathetic, sympathetic, and well-knowing women that I do have three legitimate distractions that keep me from planning and executing a well-thought-out celebration...but still. He is the reason I am who I am today. He is the reason I celebrate each day, my life, my family, my creative side, my doer side, and me just as me. He deserves true celebration, a congratulations, and a loving pat on the back.

So, I did some research. I just can't help myself but think it over beforehand, and then over again. I searched the internet for "gifts for guys," "gifts for men," and "gifts for him." Luckily, now on the heels of the giving holiday season and gift giving tips are still plentiful! (Can I just say, that there are some pretty darn talented crafty guys out there, making some neat stuff! Thanks guys for so much inspiration and tips on how to make stuff for guys!)

And I did it. I still can't believe I did it. I actually put together a list of 35 gifts for a 35th birthday Top Secret Plan. (That's what I called it in code. I'd say, "I am working on your "Top Secret!")

These gifts were to be for him. And largely him only. No pilfering, messing up, using up, or wasting by the rest of us. They had to be gifts in and of themselves. No coupons for car-washes during the summer months because...I am not into washing the mini-van. These are a nice thought, but they don't get redeemed. At least not in this house. And these gifts had to not require too much pre-schooler participation. Their enthusiasm waxes and wanes and many times the project never gets finished. So, I came up with 35 things, that were presents he'd like, for him, and didn't require too much kid participation or cash.

Wanna hear what I came up with?

1. picture calendar
2. cake
3. watercolor drawing
4. work-out shirts
5. iTunes gift card
6. personal nail care set
7. picture magnets for fridge at work
8. chai tea mix
9. special beers
10. hand-made iPad case
11. belt hanger
12. custom cuff links
13. painted kids art mugs
14. sustainable house picture framed (we've always wanted to live in a sustainable home)
15. hand sewn charger cord pouches

Source: flickr.com via Abbie on Pinterest

16. 2 small felted birds wedded together
17. personalized mouse pad
18. flavored coffee
19. homemade hot chocolate mix with homemade marshmallows
20. spice tea mix
21. pocket knife
22. Johns Hopkins flip flops
23. flannel pj pants
24. key holder for back-pack
25. sundae topping sampler
26. pedi egg pouch
27. homemade grill spice sampler
28. car magazine subscription
29. Montessori education magazine subscription
30. e-tip gloves
31. hot sauce variety pack
32. Solio Bolt solar charger
33. chocolates
34. handpainted framed art - made by the kids
35. comb - that cannot be stolen by the kids

Some of these are big. Some are small. Some are hand-made, some are store-bought. But all in all, I think this what-to-give-your-guy-list isn't too shabby. (I linked a couple of the items to their DIY instructional page.)

So...did I manage to make/gather/give all 35 gifts? No. Hey! I have three children at two different co-operative pre-schools, and the third one is teething. We are on the road commuting 10 hours a week, and I don't even work outside the home! I didn't complete 35, but that is OK.

I did complete 24. This was a supreme exercise in letting go for me. Nevertheless the organizer in me got the best part. How did I give my guy 24 gifts? I'll write about that next!

Gluten Free Strawberry Tartelettes

Monday, February 13, 2012

gluten free tartelettes
I wanted to be able to eat everything at Little Miss' party. So I baked everything at Little Miss' party. Gluten-free of course.

Gluten free tartelettes:
gluten free tartelette crust The dough tastes wonderful. It is relatively easy to handle, and very easy to bake. It is adapted from this Smitten Kitchen recipe. (Just add this gluten free flour mix instead of regular flour. Oh, and don't forget to add 1/2 teaspoon of xanthan gum too.)

gluten free tartelette crust
I rolled out chilled dough to about 1/4 of an inch thick, punched out circles with a cookie cutter, and then pushed them into mini muffin tins. To get the circles into the concave muffin mold, I made a Pac-Man of sorts. Join the "mouth" edges, and push that little guy (who is now like a cone) into the mold. Press down on all sides, and presto, fast and easy, tartelette crust.

I just used a traditional pastry cream recipe and used gluten-free flour again, for regular flour. I almost forgot that real vanilla beans truly are heaven.

Fill that tartelette crust with a bit of cream, top it with a fresh strawberry and pop it in your mouth, only to remember you forgot to take a picture of it. Good thing I made 47 more.

Gluten-free petit fours

Friday, February 10, 2012

Gluten free petit fours This was an interesting experiment. Not because of the taste, but because of the talent. I felt all elbows making these. It was as if all my years of fondant experience had melted away like candy sugar in hot water, and there I was as green as the day I started baking cakes.

Although these turned out a bit wonky looking, they tasted pretty darn great. (I am eating a left over as I write this up.)

My gluten-free secrets...
I used the betty crocker yellow cake mix. The back of the box says to mix everything at once. Don't do it I tell you. Make sure your butter is extra soft. Add it and a bit of the mix to a bowl and beat it well. Add room temperature eggs one at a time and incorporate them well. Add the vanilla and mix well. Then add the rest of the cake flour mix alternately with the water. (First flour, then water, then flour, then the rest of the water and then the rest of the flour.) Beat on high for 3 minutes or so, until the entire thing is very, very, very smooth.

gluten free petit four cake
I used 11X17 jelly roll pans, buttered, lined with parchment, and then buttered again. I spread the cake batter, super thin, like 1/4 of an inch or less onto the parchment with an off set spatula. Make sure there aren't lumps or bumps.

Bake it at 350 for about 10 minutes. Check it after 8 minutes though. It should be very slightly brown around the edges, and set in the middle. Don't bake it too long! It will dry out and be crumbly.

Invert the cake onto a wire rack, peel off the parchment and let it cool completely.

I cut each 11X17 rectangle in half to get four layers (that would be 11X8 1/2 inch rectangles.)

Cake done.

Then I followed this poured fondant recipe. Very very good instruction. Except, she left one very important part out. DON'T touch the sugar when you are dipping the cakes. It is SO Hot!! I kept an ice pack handy because I was the stupid one. Seriously, 150 degree sugar versus my finger tips...whose gonna win?

Okay. I added almond extract, which is clear and doesn't change the color of the fondant, and I forgot about the marzapan. I added like 1/2 teaspoon of almond, just enough for that hint of flavor.

These were a hit. The product: well worth the effort. The sugar dried onto everything cleans up easily in some warm soapy water. And, I just hope my dentist doesn't find out.

A February Birthday

Wednesday, February 8, 2012

tea table 1 February is the time for birthdays in this home. Little Miss turned 4 years old last Saturday. A big number for a big girl. In the past year, she entered a new pre-school class. She graduated to a car booster seat. We topped 30 pounds, learned to use the potty, learned to feed herself and turned into an older sibling. And we were accepted into Montessori school.

tea table 3 
Since she is the only little girl in our family, we go all out. Part of me just can't help it.

This year it was a garden tea party. Fairy wings and wands, vintage touches, and tiny tea cups and treats completed the event. A couple of peeks into what went on behind the scenes this week.

picture frame decorating 3 picture frame decorating We gave fairy wings and wands to each little friend to take home. We made special picture frames, adorned with sticky jewels, to frame the portrait of all the party goers.

DSC_0522 DSC_0567
I made sewed little purses out of vintage-like blue floral fabric, one for each little shoulder.

coffee filter flowers materials coffee filter rosesA And I made paper roses out of coffee filters and watercolors.

Oh, and the gluten free goodies, linzer cookies, petite fours, and strawberry tartelettes...delicious. More to come on that later.

All for a little girl who turned four. For a mama who loves to craft and bake...and a sweet little girl who loves to help...it was definitely worth it. Oh

Baby Food Made at Home

Monday, February 6, 2012

baby food E Whew, Pie Pie has arrived! Suddenly, little Pie Pie went from from being a little cute pudgy bump on a log, to a movin', grabin', force to be reckoned with.

He does the inch worm to get from point A to point B in a Flash! He grabs at loose shoe laces, pony tails, and Hyung-a's underwear sticking out above his pants. And he EATs. Boy does that little guy eat.

baby foodA We've moved past the ever favorite apple/pear puree to parsnips, carrots, broccoli, butternut squash, sweet potatoes, and cauliflower.

This weekend was a whirlwind of cleaning, peeling, chopping, heating up, breaking down, cooling down, and storing many colors. Our small home smelled like a wonderful veggie soup. The kitchen windows fogged up with steam. The blender was running full speed ahead. And the freezer filled up with a beautiful rainbow of colors all waiting to be served up on a very small silver spoon to that little guy with his mouth wide open waiting for that next...sweet...bite.

Notes: I didn't freeze these in such large quantities. I broke out those ice cube trays and filled them up with those beautiful colors, tapped out the bubbles which flung some orange sauce onto the white cabinets, covered them with plastic wrap, froze them, and turned them out into labeled baggies. (So I'll be able to tell the frosty difference between squash and carrots, and parsnips and cauliflower.)

collecting

Friday, February 3, 2012

1/28/12 collecting

It is always amazing to me how children need to collect and keep. What is it about things, little items, they find so appealing? Why is the number of objects important? Why is their origin not as important. I am sure there is a child psychologist who would be more than glad to shed some light on this topic for me. But for not having met that authority yet, I'll have to settle in wonderment.

1/28/12

We were out enjoying the warm air in late January with light jackets and sneakers. The lake out back affords lots of nature exploration, if you are keen on finding it. We ventured down the path and the kids started collecting rocks. Small ones, larger ones, dark ones, shiny ones, pink ones, clear ones, and everything in between. Pockets were used. These little harden bits came home with us. (In the interest of land preservation, we'll return them to their natural habitat soon.)

Upon stepping through the door, delighted, the kids yelled to daddy, who was in bed feeling ill, "look what we found!" I smiled at the fact that they thought their "finds" were incredibly novel. Gardeners and those donning summer sandals among others I imagine might believe rocks are an impediment, rather than a treasure to behold.

1/28/12 exploring

Later, I found some rocks in their beds...These little inanimate bits of nature need to go back to their natural resting places. Very soon.


Paper Roses

Wednesday, February 1, 2012

coffee filter rosesA

I remember seeing this Martha Stewart Show segment years ago. Sitting in my living room, with a baby and crafting fingers just itching to create...I said to myself, "I could do that." And so I did. Some years later. Learning all the way.

Making these beauties is a labor of love. Tracing, cutting, arranging, taping, painting, drying, painting again, curling, and shaping...all turns into a lovely product.

A little knowledge about paper crafts and water color painting is very helpful. My later specimens are much better than the earlier ones.

Not having the cash at this juncture to spend on fresh flowers for Little Miss' fairy garden tea party, this was the time investment that will have to do.

Oh, the craft tutorial is here.
Related Posts Plugin for WordPress, Blogger...
Blog contents © Abbie Giving 2010. Blogger Theme by Nymphont.